What is Network Address Translation?
Network Address Translation (NAT) is the process where a network device, usually a firewall, assigns a public address to a computer (or group of computers) inside a private network. The main use of NAT is to limit the number of public IP addresses an organization or company must use, for both economy and security purposes.
The most common form of network translation involves a large private network using addresses in a private range (10.0.0.0 to 10.255.255.255, 172.16.0.0 to 172.31.255.255, or 192.168.0 0 to 192.168.255.255). The private addressing scheme works well for computers that only have to access resources inside the network, like workstations needing access to file servers and printers. Routers inside the private network can route traffic between private addresses with no trouble. However, to access resources outside the network, like the Internet, these computers have to have a public address in order for responses to their requests to return to them. This is where NAT comes into play.
Internet requests that require Network Address Translation (NAT) are quite complex but happen so rapidly that the end user rarely knows it has occurred. A workstation inside a network makes a request to a computer on the Internet. Routers within the network recognize that the request is not for a resource inside the network, so they send the request to the firewall. The firewall sees the request from the computer with the internal IP. It then makes the same request to the Internet using its own public address, and returns the response from the Internet resource to the computer inside the private network. From the perspective of the resource on the Internet, it is sending information to the address of the firewall. From the perspective of the workstation, it appears that communication is directly with the site on the Internet. When NAT is used in this way, all users inside the private network access the Internet have the same public IP address when they use the Internet. That means only one public addresses is needed for hundreds or even thousands of users.
Most modern firewalls are stateful - that is, they are able to set up the connection between the internal workstation and the Internet resource. They can keep track of the details of the connection, like ports, packet order, and the IP addresses involved. This is called keeping track of the state of the connection. In this way, they are able to keep track of the session composed of communication between the workstation and the firewall, and the firewall with the Internet. When the session ends, the firewall discards all of the information about the connection.
There are other uses for Network Address Translation (NAT) beyond simply allowing workstations with internal IP addresses to access the Internet. In large networks, some servers may act as Web servers and require access from the Internet. These servers are assigned public IP addresses on the firewall, allowing the public to access the servers only through that IP address. However, as an additional layer of security, the firewall acts as the intermediary between the outside world and the protected internal network. Additional rules can be added, including which ports can be accessed at that IP address. Using NAT in this way allows network engineers to more efficiently route internal network traffic to the same resources, and allow access to more ports, while restricting access at the firewall. It also allows detailed logging of communications between the network and the outside world.
Additionally, NAT can be used to allow selective access to the outside of the network, too. Workstations or other computers requiring special access outside the network can be assigned specific external IPs using NAT, allowing them to communicate with computers and applications that require a unique public IP address. Again, the firewall acts as the intermediary, and can control the session in both directions, restricting port access and protocols.
NAT is a very important aspect of firewall security. It conserves the number of public addresses used within an organization, and it allows for stricter control of access to resources on both sides of the firewall.
Showing posts with label control network.. Show all posts
Showing posts with label control network.. Show all posts
Network Programming dengan J2ME Wireless Devices
Peralatan Wireless seperti telepon selular dapat menjaga pemiliknya terhubung dengan dunia luar setiap waktu di manapun mereka berada. Mereka menawarkan konektivitas yang bagus yang tidak disediakan oleh peralatan lainnya. Pengembangan aplikasi untuk peralatan wireless ini telah menjadi permintaan yang besar pada beberapa tahun ke depan. Pemrograman jaringan memainkan peranan penting pada pengembangan aplikasi wireless untuk mengambil keuntungan dari konektivitas yang ditawarkan.
Sun’s Java 2 Micro Edition (J2ME) menawarkan platform untuk mengembangkan aplikasi yang tertanam dalam peralatan elektronik dan peralatan mobile. Pada Java 2 Micro Edition (J2ME), Connected Limited Devide Configuration (CLDC) mendefinisikan konfigurasi umum untuk broad range pada handheld devces. Pada bagian atas CLDC, Mobile Information Device Profile (MIDP) didefinisikan secara khusus untuk peralatan wireless seperti telepon selular dan two-way pagers. Penghasil peralatan wireless perlu mengimplementasikan MIDP untuk mendukung aplikasi Java pada peralatan mereka. Contohnya, Motorola hendak mengeluarkan implementasi MIDP untuk keluarga mobile phone iDEN pada kuarter pertama tahun 2001.
Pada bagian berikutnya, kita akan melihat apa yang baru pada pemrograman jaringan J2ME. Kemudian akan dibahas class HttpConnection pada J2ME MIDP dan akan ditutup dengan contoh bagaimana menggunakan class HttpConnection.
J2ME Generic Connection Framework
Pada Java 2 Standard Edition (J2SE), class yang terhubung dengan jaringan terletak pada package java.net. Kurang lebih terdapat 20 class pada package ini. Class-class ini menyediakan kumpulan fungi yang mendukung komunikasi jaringan pada aplikasi Java. Package java.net tidak sesuai untuk aplikasi wireless yang dijalankan pada telepon selular dan two-way pagers. Ukuran java.net kurang lebih 200KB. Ukuran ini terlalu besar untuk diletakkan pada peralatan wireless yang hanya mempunyai total memori dan tempat penyimpanan beberapa ratus kilobyte. Di samping ukuran, terdapat tantangan lainnya yang berkaitan dengan peralatan wireless: J2ME harus mendukung peralatan mobile yang bervariasi yang mempunyai ukuran dan bentuk yang berbeda-beda, kemampuan network yang berbeda-beda, dan kebutuhan file I/O yang berbeda.
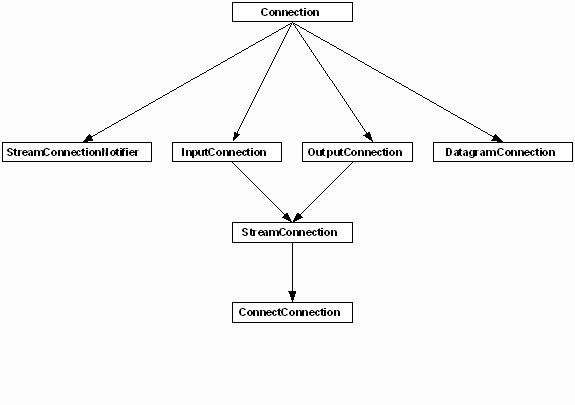
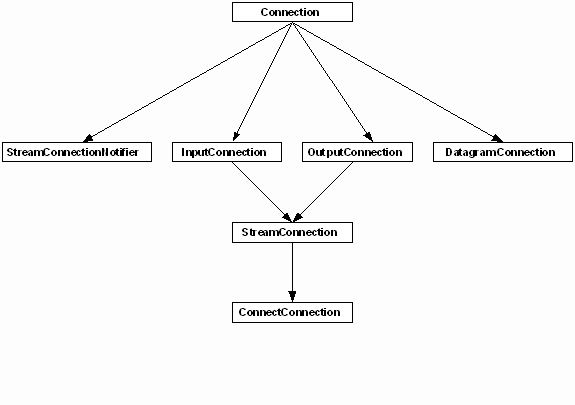
Terdapat 1 class (Connector) dan 7 interface connection lainnya (Connection, ContentConnection, DatagramConnection, InputConnection, OutputConnection, StreamConnection, dan StreamConnectionNotifier) yang didefinisikan pada Generic Connection framework. Class-class tersebut dapat ditemukan pada package javax.microedition.io yang berasal dari J2ME CLDC. Sebagai catatan, tidak ada implementasi dari connection interface pada level CLDC. Implementasi sebenarnya pada sisi kiri MIDP. Ketujuh connection interface mendefinisikan gambaran 6 tipe dasar komunikasi : basic serial input, basic serial output, datagrams communications, sockets communications, mekanisme pada komunikasi client-server, dan komunikasi dasar HTTP dengan Web server.
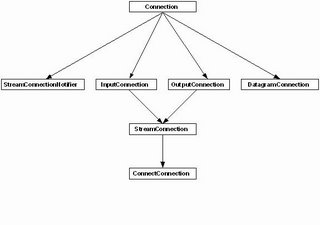
Hubungan antara interface ini diilustrasikan pada diagram berikut ini :
Seperti yang terdapat pada gambar, connection adalah interface dasar dan root dari hirarki connection interface. Semua interface connection lainnya didapat dari Connection.StreamConnection. Di dalamnya terdapat InputConnection dan OutputConnection. Hal ini mendefinisikan kemampuan input dan output untuk koneksi stream. ContentConnection diperoleh dari StreamConnection. Class ini menambah mehod tambahan dari MIME pada bagian atas method I/O pada StreamConnection.
Class Connector adalah inti dari Generic Connection framework. Alasannya adalah karena semua objek connection yang telah disebutkan di atas dibuat oleh method static open yang didefinisikan pada class Connector. Tipe komunikasi yang berbeda dapat dibuat dengan method yang sama dengan parameter yang berbeda. Koneksi tersebut dapat berupa file I/O, serial port communication, datagram connection, atau http connection tergantung dari parameter string yang dipassingkan ke method tersebut. Desain tersebut membuat implementasi J2ME mudah diperluas dan fleksibel dalam mendukung peralatan dan produk baru.
Penggunaan method tersebut adalah sebagai berikut :
Connector.open(String connect);
Parameter connect adalah variabel String. Paramenter ini mempunyai format seperti URL: {protocol}:[{target}][{params}] dan terdiri dari 3 bagian : protocol, target, dan params. Ketentuan protocol adalah jenis connection yang akan dibuat oleh method. Terdapat beberapa nilai yang mungkin untuk protocol : file, socket, com, datagram, dan http. File menunjukkan connection yang akan digunakan untuk file I/O, comm menunjukkan connection yang akan digunakan untuk komunikasi serial port, dan http menunjukkan connection yang dibuat untuk mengakses web servers.
Target dapat berupa host name, nomor port network, nama file, atau nomor komunikasi port. Params optional, menunjukkan informasi tambahan yang diperlukan untuk melengkapi connect string. Contoh berikut ini menggambarkan bagaimana menggunakan method open untuk membuat jenis komunikasi yang berbeda berdasarkan protocol yang berbeda.
HTTP communication :
Connection hc = Connector.open("http://www.wirelessdevnet.com");
Stream-based Socket communication:
Connection sc = Connector.open("socket://localhost:9000");
Datagram-based socket communication:
Connection dc = Connector.open("datagram://:9000");
Serial-port communication:
Connection cc = Connector.open("comm:0;baudrate=9000");
File I/O:
Connection fc = Connector.open("file://foo.dat");
Seperti yang telah disebutkan sebelumnya, dukungan untuk protokol ini bervariasi dari vendor satu ke vendor lainnya. Developers harus mengecek dokumentasi untuk masing-masing penghasil device MIDP untuk mengetahui apakah mereka mendukung protocol tertentu. Socket, datagrams, dan koneksi http dengan MotoSDK (kit pengembangan dari Motorola) telah diuji. Ketiga jenis koneksi tersebut didukung oleh MIDP Motorola. Sun’s MIDP mereferensikan implementasi yang hanya mendukung koneksi HTTP. Jika program membuat koneksi berdasarkan protocol yang tidak didukung oleh device manufacturer, ConnectionNotFoundException akan diberikan.
Class HttpConnection
Class HttpConnection didefinisikan pada MIDP J2ME untuk mengijinkan develoer manghandle koneksi http pada aplikasi wirelessnya. Class HttpConnection pasti tersedia pada semua peralatan MIDP. Secara teori, kita mungkin menggunakan socket atau datagram untuk komunikasi remote pada aplikasi J2ME jika manufacturer device MIDP mendukungnya. Tetapi hal ini membuat aplikasi menjadi portable karena kita tidak dapat selalu bergantung pada manufacturer device lainnya . Hal ini berarti program tersebut mungkin dapat dijalankan pada satu peralatan MIDP tetapi tidak dapat dijalankan pada device MIDP lainnya. Jadi kita pertama kali harus menggunakan class HttpConnection pada aplikasi karena HTTPConnection adalah mandatory untuk semua aplikasi MIDP.Interface HttpConnection didapat dari interface ContentConnection pada CLDC. Interface ini menginherit semua method I/O stream dari StreamConnection, semua MIME menghandle method dari ContentConnection dan menambah beberapa method tambahan untuk menghandle kebutuhan spesifik protocol http.
I/O yang terhubung:
DataInputStream openDataInputStream()
InputStream openInputStream()
DataOutputStream openDataOutputStream()
OutputStream openOutputStream()
Input stream dapat digunakan untuk membaca isi Web Server ketika output stream dapat digunakan untuk mengirim permintaan kepada Web server. Stream ini dapat diperoleh dari HttpConnection setelah koneksi dibangun pada Web Server. Pada contoh berikut ini, koneksi http dibentuk dengan web server
www.wirelessdevnet.com pada port 80 (port default). Kemudian input stream diperoleh untuk membaca respons dari Web:
HttpConnection hc = (HttpConnection);
Connector.open(http://www.wirelessdevnet.com);
InputStream is = new hc.openInputStream();
int ch;
// Check the Content-Length first
long len = hc.getLength();
if(len!=-1)
{
for(int i = 0;i
if((ch = is.read())!= -1 )
System.out.print((char) ch));
} else
{ // if the content-length is not available
while ((ch = is.read()) != -1)
System.out.print((char) ch));
}
is.close();
hc.close();
MIME yang terhubung:
String getEncoding()
Long getLength()
String getType()
Sekali koneksi http dibentuk, ketiga method dapat digunakan untuk memperoleh nilai nilai dari ketiga field pada header HTTP: Content-Length, Content-Encoding, dan Content-Type.
Protocol Http yang terhubung:
long getDate()
long getExpiration()
String getFile()
String getHeaderField(int index)
String getHeaderField(String name)
long getHeaderFieldDate(String name, long def)
int getHeaderFieldInt(String name, int def)
String getHeaderFieldKey(int n)
String getHost()
long getLastModified()
int getPort()
String getProtocol()
String getQuery()
String getRef()
String getRequestMethod()
String getRequestProperty(String key)
int getResponseCode()
String getResponseMessage()
String getURL()
void setRequestMethod(String method)
void setRequestProperty(String key, String value)
Method berikut ini untuk memperoleh informasi header: getDate, getExpiration, getFile, getHeaderField, getHeaderField, getHeaderFieldDate, getHeaderFieldInt, getHeaderFieldKey and getLastModified
Method berikut ini untuk memperoleh komponen individual yang diparse dari string URL: GetHost, getPort, getProtocol, getQuery, getRef, getRequestMethod, getRequestProperty, getResponseCode, getResponseMessage, dan getURL.
Ketiga method ini untuk dipakai bersama HEAD, GET, dan POST: setRequestMethod, setRequestProperty, and getRequestMethod
Berikut ini adalah contoh lengkapnya:
import javax.microedition.midlet.*;
import javax.microedition.lcdui.*;
import javax.microedition.io.*;
import java.io.*;
public class Sample1 extends MIDlet
implements CommandListener {
/*
* the default value for the URL string is
* http://www.webyu.com/servlets/webyu/wirelessdevnetsample1
*/
private static String defaultURL =
"http://www.webyu.com/servlets/webyu/wirelessdevnetsample1";
// GUI component for user to enter String
private Display myDisplay = null;
private Form mainScreen;
private TextField requestField;
// GUI component for displaying header information
private Form resultScreen;
private StringItem resultField;
// the "SEND" button used on the mainScreen
Command sendCommand = new Command("SEND", Command.OK, 1);
// the "BACK" button used on the resultScreen
Command backCommand = new Command("BACK", Command.OK, 1);
public Sample1(){
// initializing the GUI components for entering Web URL
myDisplay = Display.getDisplay(this);
mainScreen = new Form("Type in a string:");
requestField =
new TextField(null, "GREAT ARTICLE", 100, TextField.ANY);
mainScreen.append(requestField);
mainScreen.addCommand(sendCommand);
mainScreen.setCommandListener(this);
}
public void startApp() {
myDisplay.setCurrent(mainScreen);
}
public void pauseApp() {
}
public void destroyApp(boolean unconditional) {
}
public void commandAction(Command c, Displayable s) {
if (c == sendCommand) {
// retrieving the String that user entered
String requeststring = requestField.getString();
// sending a POST request to Web server
String resultstring = sendPostRequest(requeststring);
// displaying the response back from Web server
resultScreen = new Form("Result String:");
resultField = new StringItem(null, resultstring);
resultScreen.append(resultField);
resultScreen.addCommand(backCommand);
resultScreen.setCommandListener(this);
myDisplay.setCurrent(resultScreen);
} else if (c == backCommand) {
// do it all over again
requestField.setString("SOMETHING GOOD");
myDisplay.setCurrent(mainScreen);
}
}
// send a POST request to Web server
public String sendPostRequest(String requeststring) {
HttpConnection hc = null;
DataInputStream dis = null;
DataOutputStream dos = null;
StringBuffer messagebuffer = new StringBuffer();
try
{
// Open up a http connection with the Web server
// for both send and receive operations
hc = (HttpConnection)
Connector.open(defaultURL, Connector.READ_WRITE);
// Set the request method to POST
hc.setRequestMethod(HttpConnection.POST);
// Send the string entered by user byte by byte
dos = hc.openDataOutputStream();
byte[] request_body = requeststring.getBytes();
for (int i = 0; i <>
{dos.writeByte(request_body[i]); }
dos.flush();
dos.close();
// Retrieve the response back from the servlet
dis = new DataInputStream(hc.openInputStream());
int ch;
// Check the Content-Length first
long len = hc.getLength();
if(len!=-1)
{
for(int i = 0;i
if((ch = dis.read())!= -1)
messagebuffer.append((char)ch);
} else
{
// if the content-length is not available
while ((ch = dis.read()) != -1)
messagebuffer.append((char) ch);
}
}
dis.close();
} catch (IOException ioe)
{ messagebuffer = new StringBuffer("ERROR!"); }
finally {
// Free up i/o streams and http connection
try {
if (hc != null) hc.close();
}
catch (IOException ignored) {}
try
{ if (dis != null) dis.close(); }
catch (IOException ignored) {}
try
{ if (dos != null) dos.close(); }
catch (IOException ignored) {} }
return messagebuffer.toString();} }
sumber:
www.wirelessdevnet.com/channels/ java/features/j2me_http.phtml
http://www.roseindia.net/software-tutorials/detail/17131
Pengenalan router WAN
Router adalah sebuah komputer khusus, router mempunyai komponen-komponen dasar
yang sama dengan PC desktop, Router mempunyai CPU, memori, sistem bus, dan
banyak interface input/output. Router didisain untuk melakukan tugas khusus yang tidak
dimiliki oleh PC desktop. Contoh, router menghubungkan dan mengijinkan komunikasi
antara dua jaringan dan menentukan jalur data yang melalui koneksi jaringan.
Sama dengan PC, router membutuhkan operating system untuk menjalankan fungsinya,
yaitu Internetwork Operating System (IOS) software untuk menjalankan file-file
konfigurasinya. Konfigurasi-konfigurasi ini berisi perintah-perintah dan parameter yang
mengontrol aliran trafik yang masuk dan keluar dari router. Router menggunakan protokol
routing untuk menentukan jalur terbaik.
Komponen utama dari router adalah random-access memory (RAM), nonvolatile randomaccess memory (NVRAM), flash memory, read-only memory (ROM) dan interfaceinterface.
RAM mempunyai fungsi dan karakteristik sebagai berikut:
− Menyimpan tabel routing
− Menangani cache ARP
− Menangani cache fast-switching
− Menangani packet buffering dan share RAM
− Menangani antrian paket
− Menyediakan temporary memory untuk file konfigurasi pada saat router bekerja
− Data akan hilang pada saat router dimatikan atau restart
NVRAM mempunyai fungsi dan karakteristik sebagai berikut:
− Menyediakan storage untuk file startup configuration
− Data masih ada walaupun router dimatikan atau restart
Flash memory mempunyai fungsi dan karakteristik sebagai berikut:
− Menangani IOS image
− Memberi akses software untuk melakukan update tanpa harus melepas chip pada
prosesornya
− Data masih ada ketika router dimatikan atau restart
− Dapat menyimpan beberapa versi software IOS
− Merupakan tipe dari Electrically Erasable Programmable Read-only Memory
(EEPROM)
ROM mempunyai fungsi dan karakteristik sebagai berikut:
− Menangani perintah-perintah untuk keperluan diagnosa power-on selt test (POST)
− Menyimpan program bootstap dan dasar operating system
− Membutuhkan melepas chip pada motherboard pada saat melaukan upgrade software
Interface mempunyai fungsi dan karakteristik sebagai berikut:
− Menghubungkan router ke suatu jaringan sebagai keluar masuknya paket data
− Hanya berada dalam motherboard atau sebagai module yang terpisah
Load balance tiga modem di satu router (Ubuntu)
Load balance tiga modem di satu router (Ubuntu)
#!/bin/sh
# Dapet dari makassar-slackers.org
# moga-moga bisa ;-D
# moga-moga bisa ;-D
# Parameter Speedy 1
T1=speedy1
IF1=eth1
IP1=192.168.1.2
GW1=192.168.1.1
NET1=192.168.1.0/24
T1=speedy1
IF1=eth1
IP1=192.168.1.2
GW1=192.168.1.1
NET1=192.168.1.0/24
# Parameter speedy 2
T2=speedy2
IF2=eth2
IP2=192.168.2.2
GW2=192.168.2.1
NET2=192.168.2.0/24
T2=speedy2
IF2=eth2
IP2=192.168.2.2
GW2=192.168.2.1
NET2=192.168.2.0/24
# Parameter Speedy 3
T3=speedy3
IF3=eth3
IP3=192.168.3.2
GW3=192.168.3.1
NET3=192.168.3.0/24
T3=speedy3
IF3=eth3
IP3=192.168.3.2
GW3=192.168.3.1
NET3=192.168.3.0/24
ip route add $NET1 dev $IF1 src $IP1 table $T1
ip route add default via $GW1 table $T1
ip route add $NET2 dev $IF2 src $IP2 table $T2
ip route add default via $GW2 table $T2
ip route add $NET3 dev $IF3 src $IP3 table $T3
ip route add default via $GW3 table $T3
ip route add default via $GW1 table $T1
ip route add $NET2 dev $IF2 src $IP2 table $T2
ip route add default via $GW2 table $T2
ip route add $NET3 dev $IF3 src $IP3 table $T3
ip route add default via $GW3 table $T3
ip route add $NET1 dev $IF1 src $IP1
ip route add $NET2 dev $IF2 src $IP2
ip route add $NET3 dev $IF3 src $IP3
ip route add $NET2 dev $IF2 src $IP2
ip route add $NET3 dev $IF3 src $IP3
ip rule add from $IP1 table $T1
ip rule add from $IP2 table $T2
ip rule add from $IP3 table $T3
ip rule add from $IP2 table $T2
ip rule add from $IP3 table $T3
# +-------------------------------------------------------------+
# | Buat Admin |
# | Edit baris dibawah kalo ada modem yang tidak connect |
# | By Sadlie |
# +-------------------------------------------------------------+
# | Buat Admin |
# | Edit baris dibawah kalo ada modem yang tidak connect |
# | By Sadlie |
# +-------------------------------------------------------------+
# Jalan pake 3 modem -> IF1, IF2, & IF3
# kalo semua modem bisa dipake
ip route add default scope global nexthop via $GW1 dev $IF1 weight 1 nexthop via $GW2 dev $IF2 weight 1 nexthop via $GW3 dev $IF3 weight 1
# kalo semua modem bisa dipake
ip route add default scope global nexthop via $GW1 dev $IF1 weight 1 nexthop via $GW2 dev $IF2 weight 1 nexthop via $GW3 dev $IF3 weight 1
# Jalan pake 2 modem -> IF1 & IF2
# kalo hanya modem 1 & 2 yang bisa dipake
# ip route add default scope global nexthop via $GW1 dev $IF1 weight 1 nexthop via $GW2 dev $IF2 weight 1
# kalo hanya modem 1 & 2 yang bisa dipake
# ip route add default scope global nexthop via $GW1 dev $IF1 weight 1 nexthop via $GW2 dev $IF2 weight 1
# Jalan pake 2 modem -> IF1 & IF3
# kalo hanya modem 1 & 3 yang bisa dipake
# ip route add default scope global nexthop via $GW1 dev $IF1 weight 1 nexthop via $GW3 dev $IF3 weight 1
# kalo hanya modem 1 & 3 yang bisa dipake
# ip route add default scope global nexthop via $GW1 dev $IF1 weight 1 nexthop via $GW3 dev $IF3 weight 1
# Jalan pake 2 modem -> IF2 & IF3
# kalo hanya modem 2 & 3 yang bisa dipake
# ip route add default scope global nexthop via $GW2 dev $IF2 weight 1 nexthop via $GW3 dev $IF3 weight 1
# kalo hanya modem 2 & 3 yang bisa dipake
# ip route add default scope global nexthop via $GW2 dev $IF2 weight 1 nexthop via $GW3 dev $IF3 weight 1
Software untuk "remote" komputer lain yang berada dalam network yang sama

Anda mempunyai beberapa pc atau laptop yang disambungkan dalam network atau router yang sama melalui wireless atau cable? Dan anda selalu diganggu oleh kakak2 atau adik2 anda untuk menyelesaikan masaalah mereka berkenaan pc atau sebagainya? dan bagaimana pula jika mereka berada di halaman rumah atau di dapur dan anda pula berada di dalam bilik? Malas la pulak nak bangun pergi dapur atau ruang tamu kan? jadi inilah penyelesaian terbaik iaitu anda hanya perlu remote sahaja komputer atau laptop kakak or adik anda itu di dalam bilik dengan mudah.
Real VNC merupakan salah satu software yang agak ringkas dan mudah digunakan.
Cara-cara meng-install :-

1. Klik Next

2. Accept dan klik next untuk seterusnya

3. Pilih destinasi program untuk diinstall.. dan klik next

4. Bagi la nama ape2 pun xkisah.. Next lagi… fuih.. byk nye next..

5. Pastikan checked pada checkbox assosiate tu dan klik next..

6. Klik install button

7. Ya.. itu dia anda dah berjaya install!!!
**Pastikan anda install software ini pada setiap komputer yang ingin anda remote**
Ok, Sekarang cara-cara macam mana nak set dan gunakan pulak :-

Sebelum anda boleh remote pc, pastikan setiap pc hendaklah me-running kan VNC server terlebih dahulu.

Then, double klik kat icon VNC di kanan bawah pc anda.

Tetapkan password untuk setiap pc, untuk memastikan anda mendapat privacy.. hehe kalau adik anda or kakak tau pc anda punya password maka dia boleh remote anda tanpa anda sedari dan mengetahui setiap apa yang anda lakukan.
Abaikan features yang lain-lain itu jika anda new user.. dan untuk advance user anda buat la apa yang anda rasa patut. Nak adjust port pun boleh.

Dan, anda run VNC viewer untuk mula remote mana2 komputer yang anda kehendaki dengan memasukkan ip address komputer tersebut sebelum anda diminta untuk memasukkan password.
Untuk advance user, anda juga boleh melakukan remote daripada mana-mana tempat. Contohnya dari pc pejabat anda ke pc di rumah anda dengan melakukan port forwarding. Dan process ini tidak memerlukan anda berada dalam network yang sama tetapi melalui internet. Dan ip address akan kelihatan lebih kurang begini ” 10.16.208.42:5000 ” yang mana 5000 tersebut adalah port komputer yang anda set kan.
Untuk mendownload software ini klik disini
Subscribe to:
Posts
(
Atom
)